
Have you ever found yourself scratching your head, trying to figure out which cable gland size you need for your electrical project? Well, you’re not alone! That’s why we’ve put together this comprehensive guide on electrical cable gland size charts, complete with a handy PDF you can download Electrical Cable Gland Size Chart PDF and keep for reference.
Whether you’re a DIY enthusiast or a professional electrician, this article will help you navigate the sometimes confusing world of cable glands with ease.
What Are Cable Glands and Why Do They Matter?
Before we dive into the nitty-gritty of size charts, let’s talk about what cable glands actually are. Think of cable glands as the bouncers of the electrical world – they’re the tough guys that protect your cables from damage and keep them securely in place. They also help seal off electrical enclosures from dust, dirt, and moisture, which is pretty important if you don’t want your equipment to go kaput!
Cable glands come in all shapes and sizes, kind of like shoes. And just like with shoes, getting the right fit is crucial. Too big, and your cable might slip out; too small, and you might damage the cable or compromise the seal. That’s where cable gland size charts come in handy.
Understanding Cable Gland Size Charts
Now, let’s get down to business. Cable gland size charts might look like a bunch of numbers and letters at first glance, but they’re actually pretty straightforward once you know what you’re looking at.
The Basics of Cable Gland Sizing
Cable glands are typically sized based on two main factors:
- The diameter of the cable
- The thread size of the entry point on the electrical enclosure
Most charts will list these measurements in millimeters (mm) for the cable diameter and either metric (M) or NPT (National Pipe Thread) sizes for the thread.
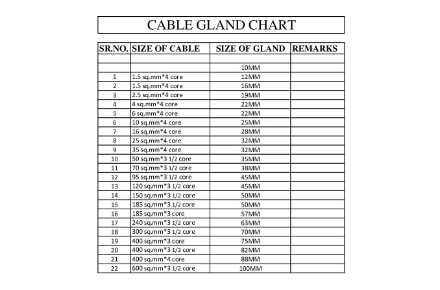
Reading a Cable Gland Size Chart
Here’s a quick breakdown of what you might see on a typical cable gland size chart:
- Cable Diameter Range: This shows the minimum and maximum cable diameters the gland can accommodate.
- Gland Size: Often given as a code (e.g., M20, PG13.5) or in inches for NPT threads.
- Overall Length: The total length of the gland from end to end.
- Entry Thread: The size of the thread that screws into your enclosure.
For example, you might see something like this:
Cable Diameter: 6-12mm
Gland Size: M20
Overall Length: 45mm
Entry Thread: M20 x 1.5
This tells you that this particular gland can handle cables between 6mm and 12mm in diameter, has an M20 thread, and is 45mm long overall.
Types of Cable Glands
Before we get to the PDF, it’s worth mentioning that there are different types of cable glands for various applications. Here are a few common ones:
- Single Compression Glands: These are your basic, no-frills glands for general use.
- Double Compression Glands: These provide extra sealing and strain relief for heavier cables.
- Armored Cable Glands: Designed for use with armored cables, providing a secure connection and earthing.
- Explosion-Proof Glands: Used in hazardous areas where sparks could be dangerous.
Each type might have its own sizing considerations, so make sure you’re looking at the right chart for your needs.
The Cable Gland Size Chart PDF Download
Alright, drumroll please! Here’s the moment you’ve been waiting for – the cable gland size chart PDF. We’ve compiled a comprehensive chart that covers a wide range of cable glands and their corresponding sizes.
Download The PDF FileThis PDF includes:
- A detailed table of common cable gland sizes
- Cable diameter ranges for each size
- Thread sizes in both metric and NPT
- Recommended torque values for proper installation
How to Use the Cable Gland Size Chart PDF
Now that you’ve got your hands on this golden ticket of electrical knowledge, let’s talk about how to use it effectively:
- Measure your cable: Use a caliper or micrometer to get an accurate diameter measurement of your cable’s outer sheath.
- Check the enclosure: Determine the thread size of the entry point on your electrical enclosure.
- Find the match: Look up your cable diameter in the chart and find the corresponding gland size that also matches your enclosure’s thread size.
- Double-check: Make sure the gland you’ve selected is appropriate for your specific application (indoor, outdoor, hazardous environment, etc.).
- Installation: Follow the recommended torque values provided in the chart to ensure a proper seal without over-tightening.
Remember, when in doubt, it’s always better to consult with a professional or the manufacturer. Better safe than sorry, especially when it comes to electrical work!
Tips for Choosing the Right Cable Gland
Choosing the right cable gland isn’t just about size – there are a few other factors to consider:
- Environment: Will the gland be exposed to extreme temperatures, chemicals, or weather conditions? Choose a material that can withstand these elements.
- IP Rating: This tells you how well the gland protects against dust and water ingress. The higher the number, the better the protection.
- Cable Type: Different cables (like armored or shielded cables) require specific gland types for proper termination and grounding.
- Safety Standards: Make sure the gland meets relevant safety standards for your application, especially in industrial or hazardous environments.
- Ease of Installation: Some glands are easier to install than others. If you’re doing a lot of installations, this can be a time-saver.
Common Mistakes to Avoid
Even with a handy size chart, it’s easy to make mistakes. Here are some common pitfalls to watch out for:
- Overlooking cable diameter tolerance: Cables can vary slightly in diameter. Always check the manufacturer’s specifications.
- Ignoring the outer sheath: Make sure you’re measuring the outer diameter of the cable, including any sheathing.
- Forgetting about expansion: Some materials expand in heat. Leave a little wiggle room if your cables will be in a warm environment.
- Over-tightening: This can damage both the cable and the gland. Stick to the recommended torque values.
- Mixing metric and imperial: Double-check that you’re using consistent measurements throughout your project.
Real-World Applications
Let’s put all this knowledge into context with a couple of real-world scenarios:
Scenario 1: Home Workshop Wiring
Imagine you’re setting up a new power tool in your garage workshop. You’ve got a 10mm diameter cable that needs to connect to a junction box with an M20 threaded entry. Consulting your trusty PDF chart, you find that an M20 gland with a clamping range of 6-12mm would be perfect for this job.
Scenario 2: Industrial Control Panel
Now let’s say you’re working on an industrial control panel that will be installed outdoors. You’re dealing with a 25mm armored cable and need an NPT threaded gland. The chart shows you need a 1″ NPT gland rated for armored cables with an IP68 rating to ensure it’s weatherproof.
Conclusion
Choosing the right cable gland doesn’t have to be a headache. With the electrical cable gland size chart PDF we’ve provided, you’re well-equipped to tackle your next electrical project with confidence. Remember, the right gland not only ensures a secure connection but also helps maintain the safety and integrity of your electrical system.
So, the next time you’re faced with a cable gland conundrum, just whip out that PDF, take a deep breath, and know that you’ve got this. And hey, if all else fails, you can always impress your friends with your newfound cable gland knowledge at your next barbecue. Who knows, you might even start a trend of “cable gland parties” – stranger things have happened!
Remember, while this guide and PDF are great resources, always consult with a qualified electrician for complex installations or if you’re unsure about anything. Safety first!
Also Read: G5335QT2U Datasheet PDF
Disclaimer: All PDF files and images on getpdf.net are sourced from publicly accessible internet locations. All content belongs to their respective owners; we claim no ownership. The information is provided for educational and informational purposes only. If you have copyright concerns, please contact us for removal. We make no representations or warranties regarding the accuracy or reliability of the information. Use of the site is at your own risk; we are not liable for any damages resulting from your use of the content.